How to Take Powerful Before and After Pictures
This page may contain links to Amazon.com or other sites from which I may receive commission on purchases you make after clicking on such links. Read my full Disclosure Policy

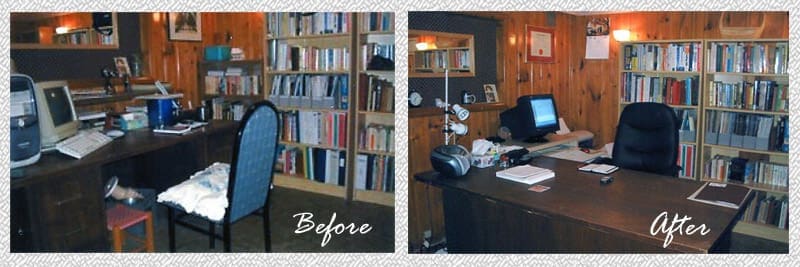
Before and after pictures can be a valuable marketing tool, whether they’re on your website or in a portfolio that you bring with you when meeting with potential clients. People don’t necessarily want to hear or read about what you can do; they want to see the outcome of your work. A picture is worth a thousand words.
If possible, take your before photos the first time you view the space to be organized, even if it’s just a preliminary meeting to discuss your services. After that first consultation, many clients will take some initial steps before you come back to help them with the major work, and your photos will be most effective if they show how the environment looked before you got involved.
You should, of course, always ask for your client’s permission before taking any photos in their home or office, preferably in writing. Assure them that their confidentiality will be maintained at all times, and make sure that any photos you take do not include any identifying information such as family portraits hanging on the wall or name plates on a desk.
Even when clients weren’t open to me using their photos in my marketing materials, I would still encourage them to allow me to take them, for two reasons:
- So I could refer to them after I left, and consider organizing options (I am an introvert, and we often need time to process information before we can act on it)
- So that when the work is completed, they can look back on the way things used to be (as a motivational tool, similar to what many dieters do)
To increase your chance of capturing effective pairs, take lots of before photos. It’s frustrating when you take pictures of the completed project, only to realize you don’t have before photos that correspond to your best after shots! You can easily discard any pictures that aren’t useful or that don’t turn out well, so it’s better to take too many than not enough.
You probably bring your phone with you to appointments, so you’re all set to take before and after photos. If you prefer not to use your phone, you might prefer to purchase a compact camera to keep in your organizer toolkit.
For maximum impact, your before and after pictures should be taken from the same angle. If viewers can’t recognize it as being the same space, the transformation won’t be nearly as striking. For this reason, keep your before photos on your phone or memory card so you can refer to them when taking your after photos.
Make sure that any photos you choose for your website, portfolio, or other marketing materials are in focus and neither too dark or washed out. Take the time to enhance them with photo editing software, if necessary.
Before and after photos may be presented side by side, in a video, or using a slider. For extra impact, include stories along with your photos, as shown on Free Your Space Organizing.
If you’re just starting your business and don’t yet have any client photos, take a look at your own home or office. If there’s any area that could use an organizing makeover, go for it! You’ll gain some photos for your portfolio, as well as a more organized space. If your place is already picture-perfect, maybe you have a friend or relative who could use some help in exchange for allowing you to take some photographs.


Great article Janet.
I sometimes have to take pictures from different angles. I use Double Take to stitch them together to make panoramic shots.
Great advice, Janet. I’ve experienced not having the right before shots when I put together the after ones, and kick myself every time.
One way to encourage clients to give permission to use the photos in our marketing materials is to show them the before and after pictures together. In my experience, they’re so happy to see the comparison and how good the place looks after, they willingly give permission–in writing of course.
Another way to neutralize photos is to use the smudge tool (I use Picassa) to literally smudge out the part of the photo that might identify where it was taken. Clients like this too.
Jacki, I never thought of stitching pictures together. The software that came with my camera will do that, but I’ve only thought of using it for outdoor panoramic shots, not interiors. Thanks for sharing that resource!
Moreen, smudging is a great option when you just can’t get a great shot without including identifying details, and Picassa’s free, which is pretty hard to beat!
Thank you, very helpful. I’m usually about an hour into a project before I think Oops, no “before” photos taken!
I hear you, Pauline! I can’t remember the number of times I’ve done a project, even in my own home, and wished I had before pictures to look back on.
My biggest struggle with before and after pictures is remembering to take the before pictures! The client and I are usually so ready to get started that we dive in!
For larger projects I also will take middle or in between pictures to help show that it is a process and not an instant result.
Thanks for sharing.
Middle pictures – that’s a great way to help prospective clients understand that you don’t have a magic wand and that things tend to look worse before they get better!
This is such a good reminder, Janet. How many times have I gotten halfway into the job and then thought, “Ugh, I forgot the before photo!” I especially appreciate the tip about removing personal photos before taking the picture so that viewers can’t “zoom in” and see what room it is.
If you forget to remove identifying information, you may be able to edit it out afterwards, but if you forget to take before pictures, it’s such a letdown. I think we’ve all done it!
Before photos are routine for me. I always take 4 photos in each room (each room that they mention needs my help, that is), one from each corner (if accessible). Then I take a couple of extra photos of specific features I expect to be organizing such as a desk or bookcase. This way if we end up rearranging the furniture I still have a “before” of that part of the room. The problem I occasionally run into is when we spontaneously start organizing a room or cupboard that we had not previously discussed. Oops!
What a great system, Hazel! Thank you for sharing.
I admit that sometimes I get so immersed in the organizing process, I forget to take the “before” picture. But that said, taking the photos is very beneficial to my client. It’s a very powerful tool that allows my client to get an objective look of what their spaces really look at. They can step away and depersonalize, and this completely alters their perspective. They are usually shocked. Likewise, when we’ve completed the project the “photos” photos are a staggering reminder of their journey and positive changes.
Great points, Nancy – before and after pics aren’t just for marketing purposes!
Such a great reminder for me to look before I leap and make taking “before” photos a routine part of my decluttering and organizing process. I also love the “afters” for letting my clients see that “after” doesn’t = perfect. We’re not going for a magazine shoot here, we’re showing how this space got to “functional and works for you.”
Another great point: they can be a great tool for setting realistic expectations!
I never quite know how the job is going to go so I tend to not take the before pictures only to be saying afterwards “I should have taken before pictures” because look at this great work we have done. I am sure I will get better at it 🙂 thanks Janet
May as well take them – if the job doesn’t go as well as planned, you can always just delete them.
Helpful article! Good reminder about making sure identifying info is not in the shot. Thanks, Janet!
I’m glad it was helpful, Sarah. Come back again soon!
I feel better knowing that I’m not the only organizer who gets so into a client’s organizing project that she forgets to take the ‘Before’ pictures! It has happened more often than I’d like to admit. WIll have to remember to take the Before and After pictures at the same angle–great advice.
It seems to be a pretty common omission! I wonder how many forget and how many are just not comfortable suggesting it to their clients at this stage of the project?
I have always taken “before” and “after” pictures of each project I work on and agree that they should be taken not only for marketing purposes but for space planning purposes as well. I do occasionally find that my afters do not always match up with my befores. I agree that it can be disappointing. Confidentiality is a huge issue for our clients so I always have them sign a consent form. If I don’t get their consent the pictures are not used for marketing, They have no problem with me using them for space planning as that is a benefit for them too.
Having a consent form is a great idea to prevent problems from arising later on.